[an error occurred while processing this directive]

Article:
GPS Exif Tags

Updated: November 16, 2011

This is an exciting story. Presentation.

This is possible thanks to the exiv2 and pyexiv2 open source projects.
http://www.exiv2.org/
http://tilloy.net/dev/pyexiv2/
Thanks Andreas and Olivier (and all team members).

I love digital cameras. I've got 4 of them. I've taken 25,000 photos in 6 years. And I'd really like to show the photographs on the web with a map showing the photo location. And I don't want to mess about with maps on a web site to do this. I want it to be automatic and painless. And that's what this is about.

If you've got a digital camera and a GPS device, you can automatically map your photographs. You don't need to buy a new camera. You don't need a new GPS. It'll work with any camera and most GPS devices.

The idea is very simple:

  1. The GPS (in my case a Garmin Forerunner 305 Runners Watch) collects the GPS data and writes a GPX file of position and time information.
  2. The camera takes and stores the photographs as JPG files. Buried in the EXIF data is the time at which the photograph was taken.
  3. My software merges the data from the GPX file as new GPS Tags in the JPG file. So the JPG files are updated (without changing any image data).
  4. You can upload your JPG files to Picasa Web Gallery, Picasa will automatically display maps showing the photo location. Additionally, Picasa can export your photos to Google Earth to allow you to fly over the location while viewing a slide presentation of your photos.

Cool, eh? I told you this was exciting!

I could tell you more stories about:

  1. Google Maps and Google Earth
    - amazing technology.
  2. Generating photo galleries in Python.
  3. Writing a lightbox application which uses image drag-n-drop in the browser.
  4. Adding drop shadows and reflections to your photos. Coverflow for your photos in the
  5. gpsbabel and libusb for reading from a GPS (and writing to the GPS).
All these are great stories which I'll add to the web site eventually!

Download current libraries: 
pyexiv2 0.3.2 + exiv2 0.22 for python27
pyexiv2 0.3.2 + exiv2 0.22 for python26
Download retired libraries: 
pyexiv2 0.1.2 + exiv2 0.17 click here
pyexiv2 0.1.3 + exiv2 0.18 click here
Installation:See ReadMe.txt in download
OR click here
Python code:click here
Mac OS X build notes:
Windows build notes:
Linux build notes:
click here
click here
click here
Maps and Photos
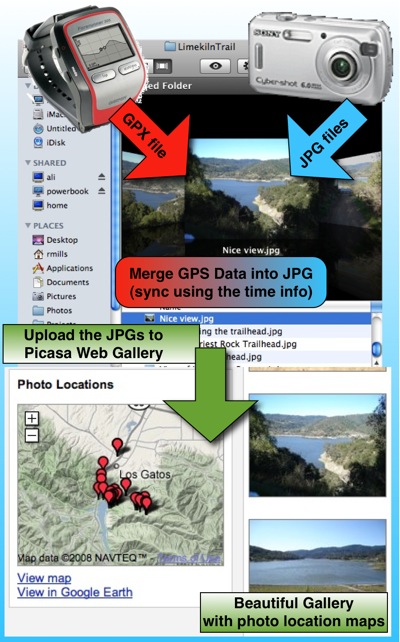
http://picasaweb.google.com/robinwmills/GPSTesting

And the solution is platform independent. I've written it in Python. It requires quite a collection of software to make this work including:

  1. The exiv2 libraries
    (to read/write EXIF data within JPG files)
  2. The pyexiv2 python wrapper.
    (to connect libexiv2 to Python)
  3. Boost to enable Python and C++ to work together.
  4. bjam to build the Boost components.
  5. scons to build the pyexiv2 wrapper.
  6. Some Python stories about reading XML and dealing with rational numbers.

That's quite a list to get started!

If you don't want to be bothered downloading and building all this stuff, I've got good news. You can download the libraries from this site. I've built it for Mac OS X (Universal binaries for 10.4 and up) and Windows (XP and up), and Linux. Unix guys - you'll have to build your own libraries. However the Python script should work fine.

To download the libraries, please see box at top of page.

Article

Acknowledgements

Before launching into the details here, I'd like to thank somebody who's made it possible to do this work. Olivier Tilloy wrote the python wrapper for libexiv2. I've enjoyed email correspondence with Olivier and he has been very encouraging of my efforts.

Andreas Huggel is the author of libexiv2 and of course he's made it possible for Olivier to do his part. I've spoken to Andreas about this and he has also been very helpful.

I'd like to thank Rob Wallace in New Zealand for cooperating in the preparation of the windows notes. Rob was especially helpful in the development of the cross-plaform SConscript file required for pyexiv2. Thank you, Rob.

I believe I haven't needed to even look at a line of code written by Olivier or Andreas - everything just builds and works fine. Well the build isn't a lot of fun - however it does build on Mac OS X, Windows and Linux.

And I've also had some help from Frank and Stani and Anders. Open Source Warriors. Thanks guys.

About the Python Code

The python code's here: click here.

I hope you'll find the code clear and obvious. There are several things which happen:

  1. I have to guess the delta time between the GPS and the Camera. You can read the comments in the prolog about this. And I discuss this a little further below.
  2. I read the GPS data from the gpx files into memory. This data is stored in a dictionary. The key of the dictionary is the time (in XML date format). So it's like this:
    Key = XMLTime :Value = [ latitude, longitude, elevation]
  3. I go over every file in the directory to see if it's an image. If the file was tzinfo or any of the GPX files, then it's ignored. If the file cannot open, it's not an image and is reported. So this pass builds a dictionary of images. The key and values are simply the pathname and it's timestamp. So imagedict is like this:
    Key = XMLTime :Value = pathname
    I've did this to ensure that the files are processed in the correct time order. When you inspect the output of the script, it's much easier to spot something amiss (such as an elevation error) when the images appear in the correct time sequence.
  4. And finally, I go over the dictionary of images files. I obtain the image's time stamp and search for the closest GPS location in the timestamp dictionary. The GPS data is then added to the image and saved.
And that's all there really is to it. However there are some little details along the way.

  1. The GPS time stamp data is an XML date in the format YYYY-mm-ddTHH:MM:SSZ (example today is April 16, 2008 and it's 00:20:45 (just gone midnight in Calfornia). In UTC that's 2008-04-16T07:20:45Z (7 hours ahead of us). The pyexiv2 wrapper uses python datetime to represent time. So we have to convert. The script has to guess the delta between UTC and the Camera. It guesses that this is the local time conversion (taking into account daylight saving). This is recorded in the file tzinfo as seconds. If you rerun the script, it doesn't guess - it reads tzinfo. You could use this to adjust for incorrect time setting of the camera. It also means that a directory of photos will reprocess correctly - even when run on a computer in a different timezone.
  2. My Garmin records position about every 5 seconds. So the search for the time I do this using a modified binary search of the timedict. Remember the GPS and Camera might not 'flash' at the same second. The search finds the closestGPS data before (or equal to) the camera time. You could get clever and interpolate the GPS data - however I decided to skip this complication. I usually stop to take photos, so it would make little difference to the position. If you're taking photos from a fast moving vehicle, or with a GPS which records less frequently, you may wish to add GPS interpolation.
  3. Coordinates in the Exif data are stored as rational numbers (the ratio of two integers). I found the little package surd.py on the internet and I've included it unmodified with gps.py. I found a bug with this. Some elevations were not being handled correctly. I added code to gps.py to ensure that elevation is to the nearest 0.1 metre. This fix is sufficient to correct the elevation issue - however it doesn't address the wider issue that surd.py is creating surds which are not accepted by pyexiv2. I'll fix this sometime in the future.
  4. Coordinates in the GPS data are stored as ascii strings which represent floating point numbers. I've provided functions to convert back and forward between floats and degress, minutes and seconds for presentation purposes.
  5. Finally, I've used a little python trick to locate the surd.py package. To save you the inconvenience of putting on your PYTHONPATH, you simply keep it beside gps.py. There's code to modify the module search path by adding the directory which contains gps.py. So you should keep gps.py and surd.py together and put them in a directory on your path.

And that's the story. I hope you find this useful. Send me your bug reports!

Building the libraries on Mac OS X

Separate document: click here.

Building the libraries on Windows

Separate document: click here.

Building the libraries on Linux 

I built this on the Hardy Heron distribution of Ubuntu (8.0.4). I didn't find it as easy to build as described on the Development web site: http://tilloy.net/dev/pyexiv2/developers.htm.

I encountered the following gotchas:

  1. Installed and built boost in ~/gnu/boost_1_35_0
  2. Added BOOST_ROOT to my environment (in ~/.cshrc)
  3. Added a symbolic link in /usr/local/lib/libboost_python.so -> libboost_python-gcc42-mt.so
  4. Downloaded and built expat, gettext, exiv2.
    Usual build sequence:
    ./configure
    make
    sudo make install
  5. I put Python-2.5.2 in my build tree (maybe not not necessary)
  6. Replaced pyexiv2/src/SConscript with this version: click here.
  7. To install, I had to use:
    sudo /bin/csh to obtain a new shell. Then
    scons install && exit to install.

Your mileage may differ. I'll be interested to learn how to avoid these steps. Anyway, it's done and working. Here's my build tree:

44 /home/rmills/gnu> ls -alt
drwxr-xr-x   6 rmills  staff  16384 Aug 19 19:43 pyexiv2
drwxrwxrwx  12 rmills  staff  16384 Aug 19 19:04 boost_1_35_0
drwxr-xr-x   9 rmills  staff  16384 Aug  1 16:43 exiv2-0.17.1
drwxrwxrwx  11 rmills  staff  16384 Apr  9 21:14 gettext-0.17
drwxrwxrwx  13 rmills  staff  16384 Apr  9 21:08 expat-2.0.1
drwxr-xr-x  19 rmills  staff  16384 Apr  9 21:07 Python-2.5.2
45 /home/rmills/gnu> 

The build script

This script doesn't build the libraries. It builds the zip file which is published on the web. It was surprisingly difficult to construct and contains some useful lessons.

I wanted to be able to collect all the things together into a zip archive to be published on the web. And I thought "Oh, that can't be difficult". Well it took time to figure out how to mount the Linux correctly from the Mac. And then the script had to be written and tested. So it took a couple of days.

I construct the universal binaries in the build script. And finally, I create the zip file.

The Mac can create zip files from directories directly in finder. This is actually implemented as you would NOT expect by the "ditto" command instead of one of the "gz**" utiliities. Anyway it's done.

Build script: click here. There's another script "release" which actually copies stuff to the web using ftp (and some other details). I've decided not to publish this because it's too boring.

setup.py

I really wanted to create a setup.py script for the release. Then you could simply do:

sudo python setup.py

This would install the stuff and set up the links. However, I haven't done this. I was fed up with the project by this time. If somebody would like to contribute, I'd be very happy to accept their assistance.

One of the difficulties of setup.py is that it has to know where to install gps.py and surd.py on your path. I haven't studied or thought about this puzzle. Maybe the python setup generator has some magic to make this trivial.

Road Map: jBrout, Phatch and exiv2

jBrout is a photo browsing application. It's python based and ships on Windows and Linux. The next version will include my build of pyexiv2. http://jbrout.python-hosting.com.

Phatch is an opensource project for a 'Photo Batcher'. It has a library of Action Items such as photo scaling. Actions can be easily sequenced into a work flow to perform processes. Phatch is written in Python - so this seems like the natural home for my code. The Geotag 'action' in Phatch is based on the python code in this article. http://photobatch.stani.be/.

Andreas, the wonderful author of the exiv2 library has asked me to work on the Windows build. I'm delighted to accept this challenge.

Comments?

I'm very happy to accept comments, feedback and suggestions for any of my articles. I'm always happy to hear you - especially if you have constructive suggestions. And I'm particularily pleased if you can let me know about corrections.


Home ......... About

Page design © 1996-2011 Robin Mills / webmaster@clanmills.com

Updated Wednesday November 16, 2011